 In many ways I am a typical twenty-first century recordist. Most everything I do is done with a few preamps, a few microphones and a computer. When I mix, I mix with a computer, a mouse, a Presonus FaderPort, one compressor (a Distressor) and a host of plugins. This is me. This is what I do. This is what I am comfortable with.
Yesterday I stepped out of my typical environment and did something crazy. I stepped into the UNcomfortable. I mixed a song not IN the box, but OUT of the box! That's right, I put away most of my plugins and traded them in for outboard equipment. I stopped using my mouse and started moving real faders and pots. I traded in my small bedroom studio for a large mixing room at Blackbird Studio B. I had a freakin' blast!!!
It's been a while since I posted a blog. I thought this would be the perfect time. I left the studio 14 hours ago. I can still recall most of my settings, my workflow, the equipment I used. I wanna take you through my 11 hour day and tell you what happened to the best of my ability. Feel free to post questions and I'll be quick to reply.
A huge thanks goes out to Shane Wilson, Reid Shippen, Andy Dodd and Taylor Nyquist for your tips and advice while I prepared for my session. A huge thanks goes out to Leland Elliot, my assistant for all your help! This would have been extremely challenging if it were not for all of your help! Thanks guys!

THE SETTING AND THE SONG
"Love and Life" is the title cut from John Stearns' upcoming EP written by Tyler Miller of Campaign. John is a vocalist that I met at Saddleback Church. He was the worship leader at Saddleback Irvine and I was an instrumental director at the Lake Forest Campus. John is a great friend and a fantastic artist. He has sung BGVs on countless records that I have produced. The rest of the EP was mixed by Lee Bridges. Lee did a fantastic job on the other tunes so I wanted to rise to the occassion and do a great job mixing "Love and Life." This sounded like the perfect reason to go all out and mix the song on a console.
I was introduced to Blackbird Studio by engineer, Mitch Dane. When I f
irst visited Nashville, Mitch was kind enough to meet with me for coffee. We met in Barry Hill and he took me
over to Blackbird where Vance Powell was mixing a record for Jars of Clay. I was given a tour of the massive facility and was floored. I had never seen a studio like it. There were 8 studios, over 1,000 microphones and tons of priceless vintage gear.
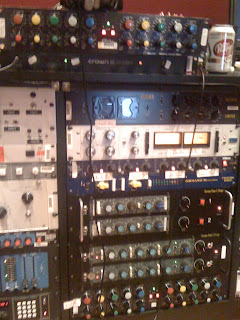
I mixed "Love and Life" at Blackbird's Studio B, which features an API Legacy Plus 48/96 channel mixing console. This is actually the same studio Vance was using to mix the Jars record. There were several racks of outboard gear including 1176's, Neve EQ's, GML 8200 (2), Tube Tech CL1B, Lexicon Reverbs and more. The studio had ATC full range loudspeakers in the walls, Genelec 1030's and I brough my ProAc Studio 100's from home. The studio provided a JBL Sub for me to use with my ProAcs.

WHEN I ARRIVED
When I arrived at the studio, Leland and I plugged in the hard drive and spent about an hour being sure that everything was ready and that I had all of the plugins I needed. I planned on doing a hybrid approach to mixing this song so I figured I would need many of my plugins from home. I brough my ilok and we installed my SSL Bundle and the Sound Toys FX Suite. The studio had nearly everything else I needed.
We spent some time spreading all of the tracks across the desk. There were 48 channels channels with automation and an additional 48 small channel faders where we ended up routing our FX returns. Very few channels needed summed ITB (In The Box) before hitting the console. The only channels that I did this with were the synth tracks and some of the Stacked BGVs. Everything else was split out onto the desk and summed on the console.

BALANCING
One of the cool things about mixing on a console was the ability to easily get balances, panning and general EQ shaping happening. It was really great to be able to reach for any channel at any time to make tweaks. It sounds small, but this kind of tweaking ITB take a bit more time. Anything that must be done with a mouse takes time. This process is made better with control surfaces like Digidesign/Avid's Icon consoles, but they are expensive (and I want one! ha).
I found myself many times along the way throwing the faders back down and starting over. Each time I did this, I found that my focus on the song got better. I really enjoyed this part and felt it really helped me gain perspective. I do this at times ITB, but it was not as easy and natural as doing it on a desk.
OUTBOARD GEAR
Once I had some overall levels set, it was clear which instruments would need additional compression to level things out. This part was fun. I experimented with different pieces of gear on different instruments until I found what really worked.

DRUMS
Drums on this song were recorded by Dan Bailey playing one of his many vintage Ludwig kits. It was recorded on an API Legacy Console at Signature Sound Studios in San Diego, CA. Kick and Snare Drums and Overhead mics were recorded with Neve 1073 preamps.
KICK DRUM
If I recall the Kick In was recorded with an RE-20 and the Kick out was an NS10 Sub Kick. I used the UAD SSL Channel Strip to gate both tracks (I love the sound of the SSL gates) and I added Waves' MaxxBass as well. All EQ was done at the console and Compression was added to the Kick In track with a Distressor (4:1, slow attack, quick release with Dist 3 harmonics engaged. About 2-3db of gain reduction). After compression, I added the SPL Transient Designer and added a touch of attack and sustain.
I loved the API EQ on Kick. There's not a lot of frequency options and the knobs adjust at 2db increments. I was surprised at how much EQ I was able to add without things getting harsh. A great deal of 50hz was added, I cut 2db at 240hz, added 4db at 3k and 2db at 10k.
SNARE DRUM
There were three snare drum tracks. Snare top (SM57), Snare Bottom (AKG 414) and a Snare Sample track (of a Ludwig Black Beauty). The snare top track had LOT of attack with little body to the sound, the snare bottom had a good amount of buzz and the snare sample provided the meat of the sound.
I notched out a bit of ring with a McDSP EQ before sending it out intro the console. I also used a McDSP EQ to take out some low mids from the sample track. These frequencies made the sample sound fake.
Once the channels hit the console I used the console EQ to shape the sound. I added a bit of 3k to the Snare top track and 100hz to get some low end. I added a great deal of 10k and 100hz to the snare bottom track and then compressed it a great deal with one of the console's compressors (fast attack, fast release).
Once EQ was added, I bussed all three channels into another channel on the console and used a distressor to compress them all. This smoothed things over a bit and made it feel like one drum.
TOMS
Toms were not sampled. They were recorded with Sennheiser 421's through API 312 pres. If I'm being honest, the high tom could have probably used a sample. It did not have the sustain and body that I needed. It ended up being OK, but perhaps I should have sampled it. I found out at a later session that this lack of sustain was caused by the drum being mounted on a snare drum stand. The stand sucked all of the sustain right off the drum. Those rims mounts work! (wish we had used one).
EQ and Compression were done on the console. I added some 10k for some air, some 3k for some attack and a lot of 100hz to get some tone. I compressed the drums with about 6db of gain reduction with a fast attack and a med-long decay to get try and get as much sustain as possible. At the end of the chain, I used the SPL Transient designer to bring up the attack a bit. The toms were manually gated in Pro Tools.
OVERHEADS
Overheads were panned about 80% and I think I added 10k to the tune of 10 or 12db. I did not roll off the low end at all. I may have done this at the console when we recorded it. I believe we used Soundelux 195 mics to record these.
I used the API Compressors and took off about 4bd with a fast attack and a quick release. Again, I was amazed at how aggressive I could be with EQ.
ROOM MICS
We had used 1176's to compress the room mics when tracking. No additional compression was added. We tracked these with Neumann U67's which always adds a fantastic mid range bite which I like from room mics. I did at a bit of 10k to the sound.
I also employed a mono room mic which was recorded with a Royer 121. This mic really added a lot of character to the snare drum. I used the console EQ to remove a bit of 240hz.
DRUM BUSS AND FX
The drums were fed directly into the master buss on the console with no overall compression added. I did, however, add a bit of parallel compression to the drums. Kick, Snare, Toms (and Bass Guitar) were fed one of the console's 3 master busses and compressed with an EL Fatso and tucked underneath the drum kit. This added some needed thickness to the drums.
We used a TC Electronics Gold Plate algorithm to the drums. The verb was few from the snare drum, toms and room mics. Looking back, I could probably have added 15% less to the drums. A product of being in a new room I guess.

BASS GUITAR
Bass guitar was fun because it wasn't that hard. It's easy to mix when it's played well. Bass was performed by my buddy Matt Campbell.
First thing I did was duplicated the track and add Digi's new Eleven Free plugin. I dialed in a bass distortion and tucked it underneath the original track. I did this because the bass was too smooth and there was no girth to hold the bass in the mix and allow it to be heard.
I added 4b at 100hz and 2bd of 1.5k. My favorite compressor on bass guitar is a TubeTech CL-1B. Guess what, they had one!! My favorite compressor on bass guitar is a TubeTech CL-1B. Guess what, they had one!! I used a pretty fast attack and a moderately slow release. 2.5:1 ratio and took off about 5-6db.
ELECTRIC GUITARS
Electric guitars were recorded by Mike Payne and he did a great job! There were about 10 guitar tracks (not all playing at once of course). Mike recorded these at his recording studio with an SM57 and a bunch of great guitar gear.
BIG GUITARS
The big guitars were initially a problem. I could not get them to fit in track well. I eventually employed the help of an SSL Stereo Bus Compressed. I used a moderately slow attack and a quick release and used about 1-2 db of gain reduction. This did the trick. I added about 4db at 100hz and 4db at 1.5k. I rolled off the low end at about 80hz (12db slope) with a McDSP EQ while still in pro tools. I also widened the stereo spectrum with Waves' S-1.
RHYTHM GUITARS
Rhythm guitars were also rolled off at about 80hz with a McDSP EQ. Before they left Pro Tools, I added an 8th note delay using the Massey TD5 analog delay. This added just a little depth to the sound.
I compressed these guitars using an original URIE 1178 Stereo Compressor. I used a moderately slow attack and a fast release to allow the transients to pass through and cut through the big guitars a bit. I only compressed about 2-3db. I added 2db at 10k, 2db at 3k.
LEAD GUITARS/VERSE GUITARS
The lead guitars were compressed using a URIE 1176 with a 4:1 ratio. I worked the attack and release time so it took off just the edge of the transients but still cut through the track. I EQed the guitars so they had a bit more top end than the other guitars. I added 2db at 12k and 2bd at 3k. To my surprise, I used up adding a little 240hz to warm up the sound. This warm things up.
AMBIENT GUITARS
There are some fantastic ambient guitars that follow the lead guitar. This made it so I didn't need to add much FX to the direct sounding lead guitars. I did however add a long EMT 250 Church Hall algorithm from the TC Electronics unit with a 4 second delay. I added no additional EQ or Compression.
SYNTHS/PADS
All of the synths and pads were summed and blended in the box. I used Massey's Tape Head to add some warmth to the brightest synth. I EQ'd everything with Waves EQ's. I added D-Virb to the verse pad to give it some serious depth. I added a bit of the EMT 250 Hall as well to give it even more depth.
DRUM PROGRAMMING/PERCUSSION
All of the EQ and Compression was added ITB with Purple Audio MC77 plugins. Tape Head was added to thicken things up. The tambourine accentuates the backbeat so I used a little faster attack and compressed until 16th note note pattern was brought up and audible in the mix.

LEAD VOCALS
John's vocal was recorded with my Soundelux E47 through a Neve 1073 and a CL-1B Compressor. John's voice is big and warm.
I've always wanted to try compressing the lead vocal in parallel but I've never thought the results ITB was all that pleasing. This was my chance to give it a try.
A single channel within Pro Tools was sent to two channels on the console. I used Massey's De:Esser plugin for de-essing (though I added this much later in the process).
On the primary vocal channel I used the GML 8200 EQ and added 2.5db at 3.5k and 2db at 10k. The GML 8200 was then routed to a Chandler TG1 Limiter. A very small amount of compression was added to level things out.
The second LV (lead vocal) was EQed on the console with a hefty amount of 10k and 100hz and then routed to a URIE 1176 and compressed in "All Buttons In" mode with a fast attack and fast release. This track was tucked underneath the primary track. Together they created a thick vocal sound with lots of transient information and lots of meat. The vocal fit quite well in the track.
The lead vocal was treated with a lot of different FX. I used a harmonizer to further thicken the track. I then added a vocal plate from a Lexicon 480 unit. A Neve EQ was used to filter the top end of the verb which was initially very bright.
I used two delays each created with SoundToys' EchoBoy. One was a 15ips delay and the other was a stereo ping pong-type delay for the choruses.
The last delay was a wild space delay for the bridge. I wanted to create a unique, spacey atmosphere for this section.

BACKGROUND VOCALS
The primary harmony vocal EQed to add some top end. 12k I think. It was then compressed with an LA-2a opto tube compressor. A small about of the vocal plate and chorus delay were added for depth.
The chorus background vocals were summed and hard panned inside of Pro Tools. Once at the console I EQ'd to add some top at 5k and 12k. The vocals were not compressed, though they could have used a touch.
MASTER BUS
The API console has three busses (A, B and C) and then it hits the master bus. The entire mix was routed into the A bus. The drum crush channel was using B and I used C to add some parallel compression to the entire mix. I used a GML 8200 EQ where I added 4db at 100hz and 4db at 10k. The EQ was then routed into a Manley Limiter and hit pretty hard. This was then tucked underneath the entire mix, adding thickness and some hype.
All of the three busses were then routed to the master bus where I compressed the entire mix with the console's 2500. I used a slow attack and a quick release at a 4:1 ratio. I reduced only a db or so to glue everything together.

SUMMARY
All in all, it was a fantastic experience. This was definitely not my most perfect mix but it's got a lot of character, a lot of width and a lot of depth. Thus, describing the pros and cons of mixing on a console. You gain a lot of warmth, depth and character for mixing on such great stuff, but there's not as much time to get surgical and precise.
I guess in the end you can be the judge of the success of this experiment. If you happen to think it was a success then feel free to send me a million dollars so I can build a studio like this for myself. :) haha.
THE FINAL MIX
Here's the final mix. Let me know what you think!
THE FINAL MIX
Here's the final mix. Let me know what you think!

Great post !!! I'm from Geaslutz and have a lot of fun to read this :)
ReplyDeletePaul VIGUIER
Thanks Paul! Glad you enjoyed it!!
ReplyDeleteThis is one of the best mixing post that I ever read. Great job Keith. You did a great job really explaining the details of how you mixed each track. Most mix engineers wouldn't share that type of info.
ReplyDeleteShaun
Very well said and it shows what a professional you have become.
ReplyDeleteIts great that you have been able to experience the ancient art of mixing n a desk.
When comes to mixing you will learn that a Neve, SSL, or API is not as important and the environment and the Monitors and your ears. Love The ATC's. All the Big rooms out here are replacing their mains with ATC and FLushing out the Genelics with Adams.
Your right about the depth of field but you can get that with a great summing console.
Good to see young artist willing to try the limitations of analog. As you can see the judgment would be lack of creative control in trade for space and contrast.
Great Job
Hey guys. I posted a link to the final mix in case you'd like the hear the damage done :)
ReplyDeletehttp://web.me.com/producerkeith1/filechute/LOVE%20AND%20LIFE%20KES-MAIN%20ALT.mp3
Craig, I've definitely wanted to get a summing mixer! It's high up on the list. I definitely agree with you on my ears and monitoring being important. I've spent a great deal of money on my monitors, clocking and converters for that reason. Now it's time to hop into summing.
ReplyDeleteThanks for the kind words. I miss being out west! Tell Cali hello for me. :)
Good stuff, man! I thoroughly enjoyed reading this and listening to the song.
ReplyDelete